Wednesday, March 4, 2009

Great Scott!

My husband decided to honor his Scotch-Irish heritage.
When he said he would wear a kilt I did not imagine that there were so many other elements included in the Scottish outfit, especially for a formal occasion.
With the help of this wonderful image that I found on greatscotshop.com, I am getting closer to understanding and visualizing everything.

If I laughed a little bit at the beginning I came to like the idea. What sealed it was to see three handsome man in full outfit that I saw at Biltmore Estate when a wedding was taking place in the wine cellar.
Oh my! I had to admit they looked quite dashing, there was something out of the ordinary that came from seeing them in this beautiful traditional outfit. And I would have no problem whatsoever marrying my husband (again) in those clothes.

Starting from the top and going down to the feet let's see what elements we have to work with.
  • The jacket. There is a variety of jackets available to wear with a kilt. The most well known ones are Prince Charlie jacket (left), a fitted military cut jacket, traditionally worn with the kilt for more formal occasions, 100% wood with, trimmed with chrome plated Celtic buttons.
    Or the slightly more casual Argyll Jacket (right), This is the classic cut kilt jacket. In wool and silver toned celtic buttons, this jacket can be worn with a long neck tie, but can also be dressed up with a tux shirt and bow tie. it's considered semi-formal or for day wear.

  • An affordable option would be to simply wear a black button shirt.

  • The Kilt itself of course. in his family colors (Tartan of the MacLeod of Lewis). Notice that the pleats are in the back and the straight fabric in the front. Kilts are made out of wool and therefore quite heavy. After holding one, I doubt there is any risk of a gust of wind moving anything.
  • Garter Flashes: They are used with Kilt Hose (described below), the elastic is hidden
    underneath the hose (it's turned over). Colors can match or compliment the tartan.


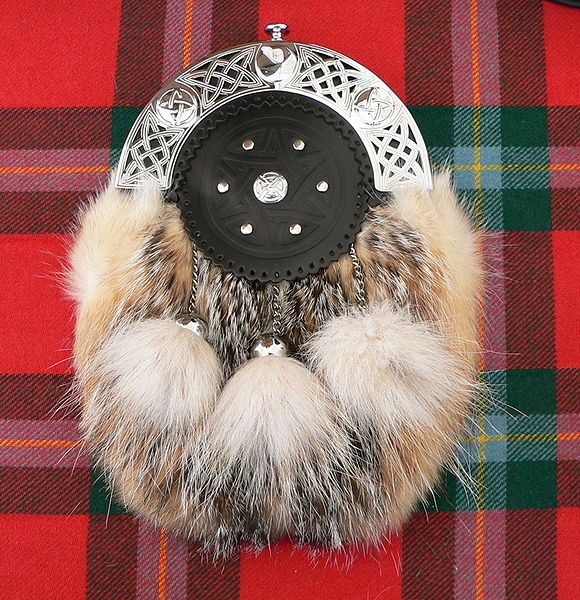
  • Sporran: Kilts do not have pockets, so the Sporran is a pouch attached to the kilt to allow the gentlemen to store anything they need. They go from very simple to fancy. Often made out of leather or fur. In my opinion black leather is nice for the groomsmen while a white fur Sporran makes the Groom stick out.
  • Kilt Pin: this is just a decorative item. It is believe that it's used to "Maintain modesty", not really because it adds weight, but because it ties two or the drapes together. All sorts of shapes can be found although a common one is in the shape of a dagger.
  • Kilt Hose: Those are simply thick wool socks that go up to your knee and that are folded over, especially when you wear garter flashes.
    They can be a plain color or with motives. Personally I like the natural wool color. They are surprisingly long, but that's because they have to be folded over several times. No risks of cold legs with those. Note: if you rent a kilt, you will however likely have to purchase the kilt hose (simple question of hygene).
  • Gillie Brogues: Originally, gillie brogues were simply a flat piece of leather with holes poked along the edges then laced at the top of the foot.. They are now considered the traditional footwear for gentlemen. There are many ways to tie them it seems, but a basic explanation can be found here: Andrew's Bagpipe.
    They are quite pretty and traditional, but in our case we knew we would not use them again, so he went for simple black shoes (a more affordable option) and it worked out just fine.
  • Sgian Dubh: This is a ceremonial dagger that you carry tucked in the hose, only part of the pommel should be visible. I see that one as optional for my husband.
  • Tie or bow-tie? While my husband was adamant about not wearing a bow tie, it came as part of the whole outfit he rented, and you know what? I think it looked even better than a tie would have. It just makes more sense with the jacket. A tie would have to match the tartan or be black. The bow tie in black is simple, dressy but doesn't over do the look. Well that's my opinion.
For more information:
A fun blog to read about kilts: http://kiltmaker.blogspot.com/ and the old address:
http://blog.albanach.org/index.html

A very interesting post on how to wear a kilt (and everything that comes with it)

Wednesday, February 25, 2009

Just checking

In the last weeks before the religious ceremony, life got hectic, it was to be expected.
The wedding happened and then, well I lost interest in this blog and choose to focus on my French one that I share with Friends, online friends and family.
I'm surprised to see the stats and that readers still come here...

So I decided not to give up on this little blog and try to finish it. Go back on the decisions we made and talk about what we did, who we used and maybe also do a wedding recap.
So stick with me and let me know if you have questions.

A climber's garter

I wasn't originally thinking about doing a garter, my husband seemed to like the idea but said it was completely up to me. My dad though when I mentioned did was almost horrified that I thought about doing it, maybe he thinks it's too old fashioned?

In the end I decided to go with my gut, I wanted a garter, one to throw away to the guys since I had a bouquet to throw to the girls, and I also wanted to make a keep sake for my husband.
I had two options: buy one or make one.

If I had bought one, I would have gone with either a University of Florida or a Miami Dolphins garter. My hubby is a big fan and I wanted something fun. Here is an example from Etsy seller: GartersbyKristi.
I like the fact that it has a fancy garter for keepsake and a lighter version to throw. And all that for only $23. I have to say that for personalized and really cute garters, Etsy is your friend. No question to it.
I like that some Etsy members manage to make a very feminine garter out of a more Masculine theme. I think we would have both laughed with one like that.

But in the end I decide to make my own, it made more sense with our budget and I could really personalize it. I got the idea from Mrs Peach post on a DIY (Sports) Garter. It looked pretty easy and I figured I would be able to manage it on my own. I did additional research and found several online tutorials, including this one: Make your own garter which had good information on how to get the right measurement for your fabric and elastic.

My garter was going to be a little bit different. My husband loves to climb and boulder and I wanted to acknowledge that side of him. I knew I wouldn't find any patter for such and idea, but with a bit of creativity it had to be manageable. My idea was to have a simple garter decorated with a very thin climbing like rope of about 3mm and a small carabiner (like the key chain kind).

I went to the local fabric store and bought lace, organza ribbon, ribbon and elastic.
I went to Diamond Brand (a sports store) and bought 2 key chain carabiners and a little bit over my thigh size lenght of 2mm rope.

1. I cut the Organza and Lace so it would be over twice the circumference of my leg where I will wear the garter. Same for the ribbon (same lenghts as the lace and organza).
Cut the elastic so it's tight enough to hold where you will wear the garter, but give extra inches for sewing.

2. By hand I sew the sateen ribbon close to the middle of the lace with a matching thread colol (same for the organza), as I went, I pushed the elastic in, making sure I had a safety pin attached to the end so it wouldn't get all the way in. It makes it easier that way.

3. I sew together both extremities of the elastic, making on last check on my leg to be sure I had it right. Then I sew together the lace extremities and the ribbon extremities. My work was far from perfect but it held together. And I figured I would have my Figure 8 Knot on top of the stitches.
At that point you have a very basic garter and all that is left to do is to decorate it.

4. At that point, it was the trickiest part for me, I had to attach the cord to the garter. It's a stiff material and it wouldn't work quite like like the ribbon and fabric with their little waves.
So what I did was to put the garter around my tight, make a figure 8 knot of the rope on top of the garter. Then I used pins to keep the rope in place, and I made stitches every few inches, looping around the rope and going in the fabric (be careful to avoid the elastic) to attach it.
For the final touch I clipped the very light carabiner to the rope.

And voilà, my Climber's garter was done. Here they are on my wedding day. They were also my something blue.
If I was to change one thing, I would probably had more anchor point for the rope, because as you can see it didn't stay straight.
My Hubby removed the garters very discreetly and I don't think anyone even saw us doing it, they were too busy dancing. He liked them so much that he didn't even send the organza one to the single mens around us (we would have removed the carabiner of course).