Showing posts with label Invitations. Show all posts

Wednesday, August 13, 2008

DIY Invitation cost breakdown

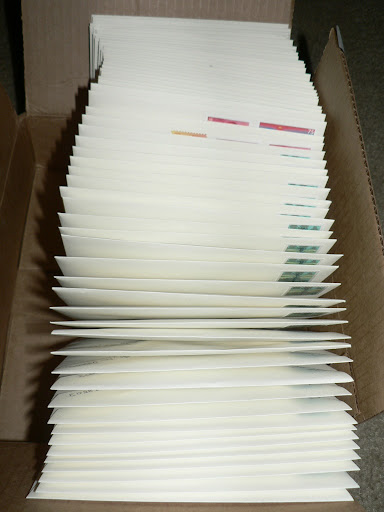
Our invitations are done and in the mail. It is now time to break down our invitation cost. More pictures to come:

Invitations supplies
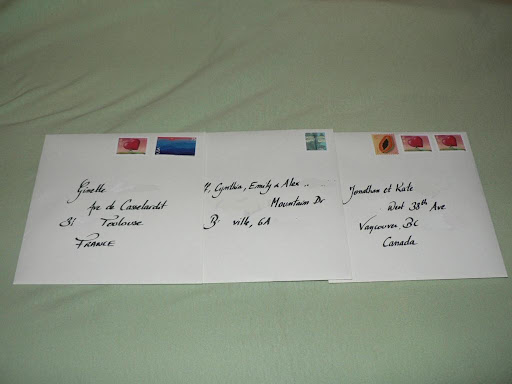
100 Marquis Ecru Outer envelop 6x6 (LCI Paper) - $23.00
50 12x12 Card Stock Soft White Linen (LCI Paper)- $16.00
+ shipping (LCI Paper) $8.50
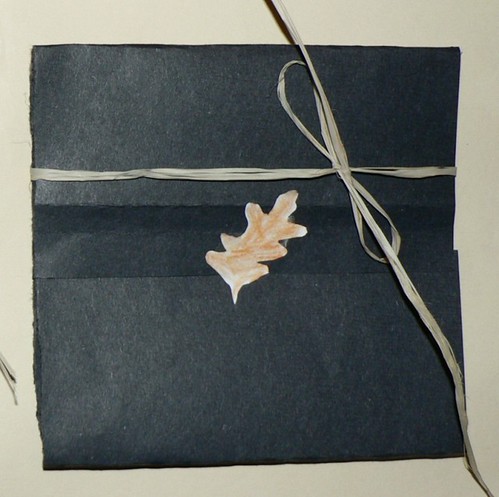
50 Paper stock nepalse paper in Brown (Nepalese Paper)-12x5.75 - free (should have been $20)*
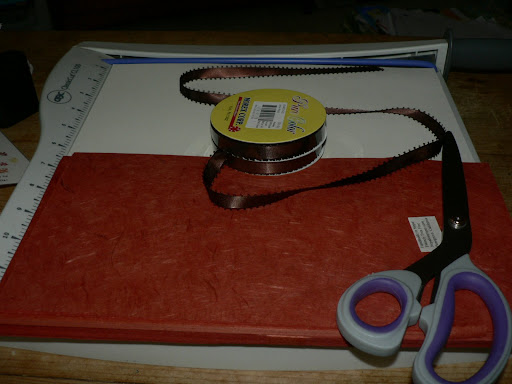
30 yard of 3/8 inch chocolate brown (AC Moore) - $11.17
24 yards of 1/8 inch chocolate brown (AC Moore) - $2.14
Cutting paper at office max - $1.25
Total $62.06

Other
Stamps:
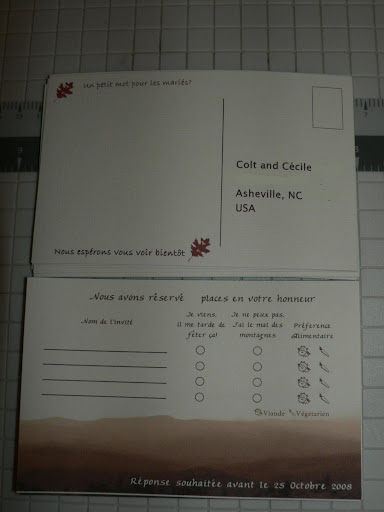
12.18 (heart) + 21.75 (blueridge)+ 14.85 (postcard) +23.56 (dragonfly) - $72.34
Calligraphy pen (Michael's) - $3.73
Total $76.07

Grand Total $138.13

With 78 invitation, some going to France and some going to the USA the average cost per invitation is $1.77 stamps included and $0.85 without stamps.
It should have been $2.02 with stamps if the Nepalese paper had been like ordered, 1.10 per invitation without the stamps.

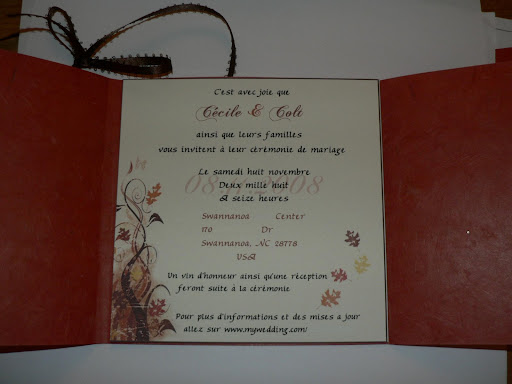
I'm amazed we made them for so little, this definitely fits into our budget, and people love them.


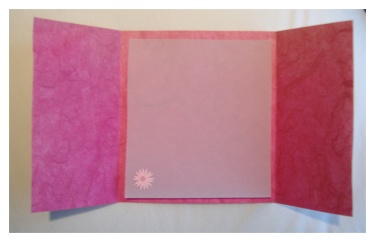
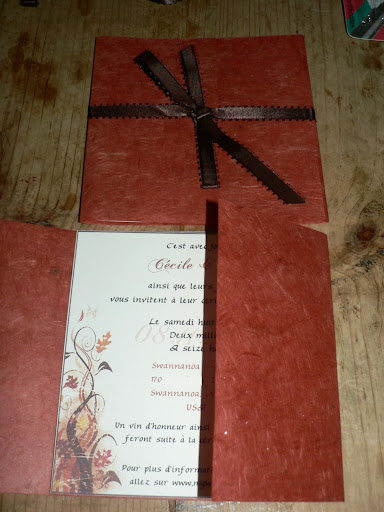
After much searching I bought the ivory card stock with a linen effect and the square ivory envelops from LCI paper, the shipping was fast, the quality of the product excellent.
The paper was 12x12 so I brought it to office max to get it cut so it would fit in our printer: 6x6.

I wanted a paper with a texture to go around our invitations, I though about all sorts of different papers, went to Michael's, A.C. Moore, and then I found a small party store that had this beautiful nepalese paper. The shop could only sell some classic letter size paper from them, so I took the name of the company, searched it online and contacted them directly.
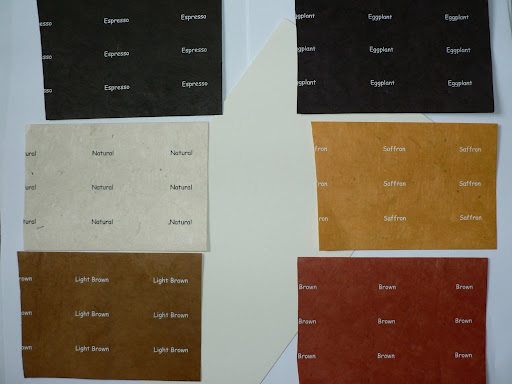
They sent me several paper samples in the brown shades and I selected light brown.
Now things got a bit complicated because I was making a custom order. Their nepalese paper is Lokta paper and it comes directly from Nepal.
At first I thought about ordering some 12x12 sheets, but I didn't want to waste tiny strips of paper and I also decided to save myself from the grueling cutting. So I ordered some 12x5&3/4 of an inch.
Because it was a custom order they had to ask for it directly in Nepal and it was to come with the next shipment (takes about 3 weeks). Well...
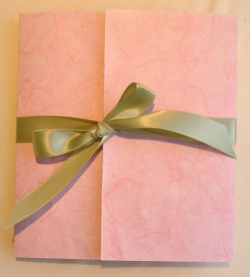
*The order was messed up and we received the wrong color, Nepalese Paper offered us to keep the paper for free because of it (it was a custom order), there was no shipping fee because we ordered other items with it.
The paper is of excellent quality, beautiful colors, and the customer service is excellent. It's a small company and they are very arranging. I talked directly with the owner chuck and when the paper came out wrong, he shipped it overnight at no extra charge so I could quickly decide whether to order the right paper or not. He is the one who offered not to charge me for the paper since 1)it was not what I asked for and 2)it's such a custom cut that he could not re-sell it.

I brought two different types of ribbons. I originally only wanted the small one, but the store only had so many left and I took them all. I ended up running out of it and had to go back to A.C. Moore. They had not been resuplied so I had to buy a larger version of the first ribbon. It was more expensive, but I don't regret it because it's very pretty too.

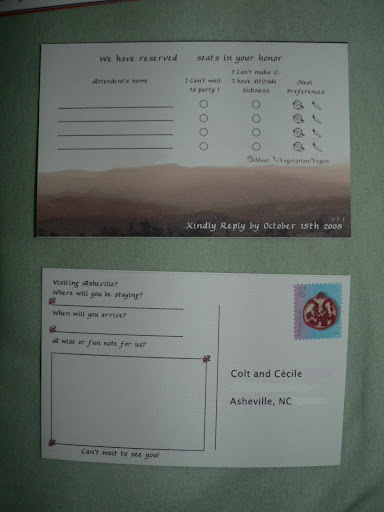
And finally, I wanted the names and address to be written down in a beautiful way. So I bought two calligraphy pens (I was not planning on running out of ink) at Michael's and wrote it all myself.

I'll do a post on how I made everything late on in case someone is interested.

Monday, August 11, 2008

My DIY Fall theme invitations

The supplies I started with: Lokta paper stock, Ivory card stock, paper cutter, printer, scissor, ribbon.
I ended up with a different shade of paper than I ordered but it still worked out in the end.
The envelops for three destinations, stamp fun someone?
From left to right: France, USA, Canada
Addresses done with a calligraphy pen by myselfFirst glimpse at the opened envelop

Side viewFirst glimpse at the invitation
French version of our invitation
English RSVP
French RSVP
Directions Card. I also created some with a column about accommodations on the left for the out of town guests.
All the elements together
Rainbow of postcard stampsClose up
Did you choose to DIY your invitations?
If you have two cultures and two different languages, did you do a bi-language invitation or two separate invitations (one for each language)?

Sunday, August 10, 2008

Design & Supplies

As I mentionned Friday, I was doing some research on our invitations.
I thought finding the paper for it would be a breeze, well not so much. But I did use the wonderful tool that is internet to figure out how to make the invitations themselves.

I quickly realized that I would have to put the ribbon a certain way to make sure it kept the invitations closed, and that the traditional layout like the following one is easier to do to present things in a pretty way.

I also decided that I wanted a fairly thing ribbon, something around a 1/4 of an inch.
I originally wanted some 6x6 invitations because I knew it would be easy to order a 12x12 paper to that size.

But the hardest part was the paper. I needed two kinds: the paper for the invitation itself, the map/direction and the rsvp and a different paper for the outside layer.
I did Michael's, A.C. Moore, nothing. They had a lot of scrapbook paper yes, but nothing I could use to create such a large number for invitations without exploding our budget.
Thankfully there is a little store: Carolina Party and Paper that had a better selection, well at least enough to get me inspired.
I looked over every single sheet of paper they had. I looked at envelops, card stock, paper stock and all the colors they had. I checked every sheet of every paper sample book in hope of finding the shade of chocolate paper with a bit of texture that my mind was set on.

This is how I came across the paper from nepalesepaper.com. The paper had a beautiful texture and and one of their paper in the sample book was exactly what I wanted. A rich chocolate color that would make you crave chocolate anytime. And they had one in the sample catalogue, they also had a very pretty light brown color that I enjoyed too because it reminded me of copper.
Because the store only carried their paper in 8&1/2 by 11, I decided to contact the company directly.
I discovered through their website that their paper is not only beautiful but good for our planet. Indeed it's the woman of the villages who make this paper and it's also tree free as Lokta is a bush that grows back quite quickly.
They sent me some paper samples so I could decide what I wanted and the owner gave me quotes on their prices.

Here are the various colors in the "brown" scheme that I received:
I decided to go for the light brown since it would look good with a chocolate ribbon. I made a custom order for 100 sheets of 12x5&3/4in paper stock. The goal was to use the paper on the outside of the invitation.

Inside, I visualized an ivory square card stock paper with fall motives such as leaves, or an oak tree branch.
Here are some examples:


I found envelops on envelopemall.com that I liked at $18.75 for 100 in chocolate or $12.95 for 100 in a natural color.


But in the end, because I wanted to order both envelops and cardstock paper from the same company to lower the shipping costs, I went with LCI Paper.

I also search for fall/autumn vectors and here is what I came across:
Autumn
Grunge Floral Background
grunge2
Flowers and foliage I really liked that one, it was actually used to make some very inspiring invitations.

I was thinking of using chocolate tone fonts.

Two websites that helped me to develop my ideas and narrow down what I really wanted are:
DIY invitations
www.invitesite.com they have incredible invitations. If only I could afford them.

Did you used internet to find your inspiration and supplies as well?

Friday, August 8, 2008

Inspire me oh paper.

Although I quickly figured out some simple Save the Date to send by email to our families, I wasn't sure what I wanted for invitations.
After a visit at David's Bridal, I received a brochure full of a variety of invitations, each uglier than the other. Well ok, not that ugly, but just too "made in china by the thousands".
I looked over it to find some inspiration however, all it told me is that I was motivated to include fall colors in it.

I wasn't thinking much of invitations when I went to the local wedding show in January 08, but that's where the inspiration started. I picked up a bunch of documents and once I got home and went through it, one of the photographer's item caught my eyes:


It's a pocket folder with various information about the work of the photograph. I didn't necessarily want a pocket folder but I liked the shape, the color and the design with the star element and the ribbon.
I did some scavanging in the house and found some supplies that could help me make some sort of mock up: a sheet of black card stock left from Halloween, raffia, and some paper I cut and colored. Here was the result.


And the open version next to the Photographer's
Nothing overly exciting, but the idea was there.
I showed my work to my husband and I really liked the whole idea.

What I wanted was something that would match our wedding colors (chocolate and copper), so a chocolate paper wrapped by a copper ribbon and a fall leaf sticker.
All I had to do was to find the right paper right, which I thought would be so easy...

What was your first inspiration when it came to your invitations. What did you imagine of them?

Friday, August 1, 2008

Bon Voyage

That's it. My invitations are gone. Well 75% of them that is, since 8 are still missing their address and 10 will be personally handed out at a party this week-end.
I am so happy they are done. It was exciting to put the stamps, cut them, get them ready and write the addresses with a calligraphy pen, at least for the first 20 or so. After that I was in robotic mode and well not the most sociable person.
I learned things while making them, little tips that could help other.
In the coming weeks, I'll try to calculate the cost of each invitations, and then once I know they've been received I'll show you pictures.
I'm very happy with what I did and I sure look forward to see the RSVP coming back to us in the mail.
I've read things about stamps that get messed up by the machine, well ours are square shaped so I know they will have to be handled manually. I was also lucky that there was this big line at the post office but I found a post office agent on the PO Box room and asked where I should put them and he took them all directly to the back room. So now the waiting begins, who will RSVP yes?

Here is the batch ready for the post office:
Where you just relieve or happy when you finally dropped your invitations at the post office? Did you asked to have them man handled?

Wednesday, July 30, 2008

Stamp your heart out

When I decide to go for square shaped envelops, I quickly found out that there would be an extra cost to it. Well, who cares for a few more cents if this is the design you want right?
On top of it of course there was a postage fee change which means that half of the stamps on the market require additional stamps to be sent.

With the invitations close to being ready I was finally able to go to the post office today and see how much it would be.

We have about 29 invitations going to France for $1.20 a piece and close to 50 going to the US for $0.83 a piece.
Dang the stupid ribbon the A.C Moore ran out of, I had to buy the bigger size and because of it the US envelops can's fit in the slot and are therefore more expensive... I guess it's one of those little details you need to look into when you make the invitations. It's definitely not something I was thinking about.

Anyway, there is this one stamp I really want to use for France and only a few post office seem to have it left: The $0.75 stamp with the Blue Ridge Mountains. This is where we are so I definitely want to use it. So I need $0.45 more to make up for the total.


For the exact sum, here is one of the best choices
++
Or we pay $0.05 extra per envelop and it's:


For the United States it's an other story. The number of combinations is pretty high.

1) Mt McKinley+Silver coffee pot
+

2)Wedding heart+Florida Panther ($0.01 over)
+

3)Yosemite ($0.01 over)


4) Two wedding hearts ($0.01 over)


5)or two Love All Heart ($0.01 over)


6)or one of each ($0.01 over)


So it's hard to choose, although I feel like option 3: just the Yosemite stamp or option 4 the two wedding heart are the best one. It matches it's not too much and yes it costs 0.01$ more for each envelop, but really I'd rather pay $0.50 more than have a gazillion of stamps on the envelop.

Did the postage fee for your envelop made you look at off combinations of stamps?

All images: USPS.com